
Guitar Chord Practice Breakthrough (Amazing 3 Step Method)

Chord fingerings can be overwhelming. We all realize that. And, learning chords can be especially crazy for us when we get a new song from our band mates, and we need to learn the finger pattern of a chord that is completely foreign for next days session.

This lesson will help tremendously when it comes to learning new chord patterns. The patented, (just kidding, it's not patented), "3-Step" breakthrough approach used in this lesson plan will help you to:
- memorize a new shape
- develop muscle memory for your fingers
- allow you to quickly start moving the new shape anywhere around the guitar neck.
WATCH THE VIDEO:

STEP ONE: Shape Association for the Fingers
In simple terms a chord pattern is a fingering shape that we need to learn on the guitar neck. The pattern will involve strings and it will involve fret-span (2, 3 or 4 frets - perhaps more). However, the pattern is also a geometrical design.
Once the geometrical design of the chord is committed to memory, the recall that you build in your mind (of that chords geometrical design) will need to be quick in order for your mind to pull-up the shape when needed.
Begin by looking over the shape of a typical 4th string root "Dominant 7th" chord pattern.
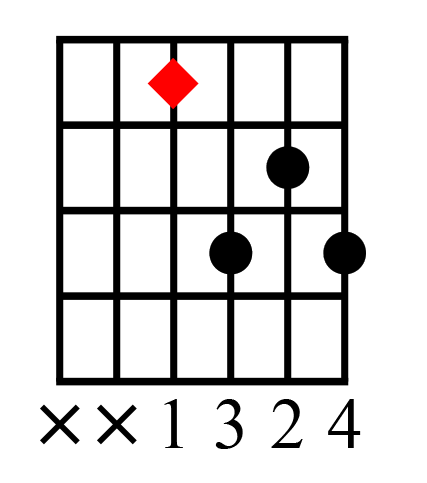
What do you notice about the above pattern? How do the fingerings compare to chords that you already know? Are there any blatantly obvious designs in the pattern? Any diagonal lines, or box shapes? How about triangles or diamond shapes? Look for anything that will stick in your memory so that you can recall this pattern quickly when you need it.
Start performing the fingering. Place you hand into the shape then release it. Do this repeatedly over and over.
NOTE: This concept was covered in my popular lesson plan titled, "Master Any Chord on the Guitar (the On /Off Switch)" If you have never watched that lesson, take a moment out right now to study that lesson plan.

STEP TWO: Re-location of Chord Patterns Vertically
In order for chords to be well associated under the fingers all around the neck on any string group the chord pattern has to be developed with excellent muscle control.
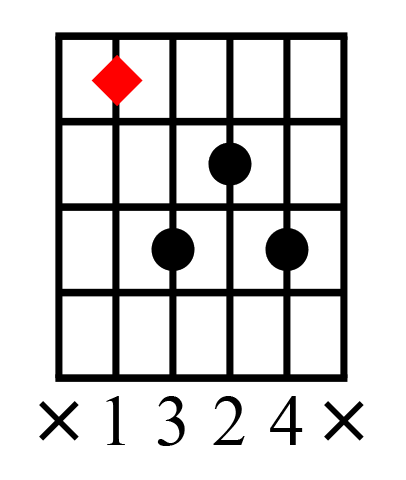
To achieve this, you can slowly begin relocating the chord design along the fingerboard vertically. For example, the chord pattern I gave back in step one of the 4th string root Dominant 7th voicing, could be re-located from the 4th-string over to the 5th.
In the diagram below notice how the chord shape from step one has now been re-located over to the 5th string. The shape is exactly the same, but keep in mind that the chord type has changed from Dominant 7th to "Major 7th."

STEP THREE: Re-location of Chord Patterns Horizontally
The final step to this process will be taking the chord shape along the neck laterally. Moving the pattern from fret to fret horizontally. The chord shape during this part of the exercise will become highly stabilized under the fingers.
One of the key components to a strong fretting ability with the hand and fingers is the ability to lock the fingers into a chord shape and then move that shape around the guitar neck. Once the hand gets used to jumping into the chord shape effortlessly, the chord pattern can be called upon at any instance when needed in a song.
Use a metronome at this stage to really nail down the chord movements so they're perfect. And, pay a lot of attention to learn how the chord feels under your fingers as it moves along and across the fingerboard. This will allow you to perform the chord easily and develop a strong sense of muscle memory for the shape.

CONCLUSION:
This 3-step process isn't an "instant cure" it will take time, but the chord shapes will develop under the fingers quicker than any other "trial and error" method out there.
The biggest problem when it comes to moving chords along the guitar is recall. And, this includes both mental recall (of the pattern) and physical recall. Once a player can move a chord from one location to another with ease, their hand technique masters the feel of the chords layout and their mind masters the recall of the chords pattern.
These areas of mental and physical recall are precisely what this unique 3-step process helps with. Once you can do this chord exercise along the fret-board, the chord patterns will drop on the neck with ease. All it takes is the application of the three steps. If you'll do it you'll get it... If you don't - you won't.
___________________________________________________
GET GOOD NOW - JOIN THE MEMBERS AREA

Categories:

