
Learn the Notes on Your Guitar in 3 Days...
Learning the notes on your guitar fingerboard is one of the most important things you can do to advance your guitar playing skills. Knowing this information opens up an enormous amount of possibilities and can help ease the learning curve for future guitar exercises.
This simple "3-day" notes on the neck study guide will give you some background information regarding how the notes on your guitar fretboard are laid out and of course provide you with some helpful tips, tools and exercises to assist you in learning the notes on your guitar fretboard as quickly as possible in as little as 3 days time.

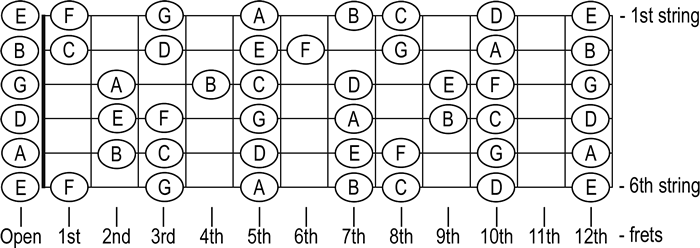
The most important notes to learn when first starting out are the natural notes (i.e. notes that are not # or ♭). Once the natural notes are memorized, it is much easier to incorporate the sharps or flats, as they will be directly in front or behind the natural note.
As the image below demonstrates, the natural notes of the chromatic scale (which are: C – D – E – F – G – A – B) and identified where each note is located on the guitar fretboard.
DAY 1:
UNDERSTANDING NATURAL, SHARP and FLAT NOTES:
Now that you know where all of the natural notes are located on the fretboard, we can now add the sharps or flats.
Sharps and Flats:
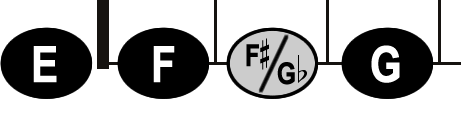
Sharps raise a natural note by a half step (1 fret). Flats lower the natural note by a half step. Between each set of notes ( except between E-F and B-C ) there will be a sharp/flat note.
For example, the note between F and G is F# or Gb, they are the exact same note just with a different names. Notes that sound the same but have a different name are called enharmonic.

SHARPS:
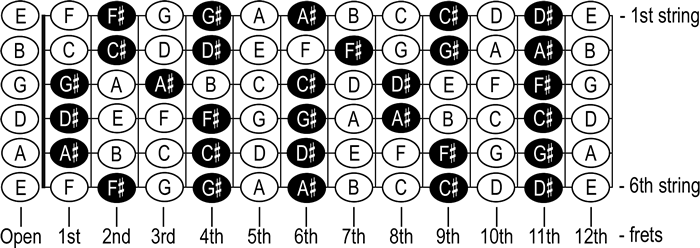
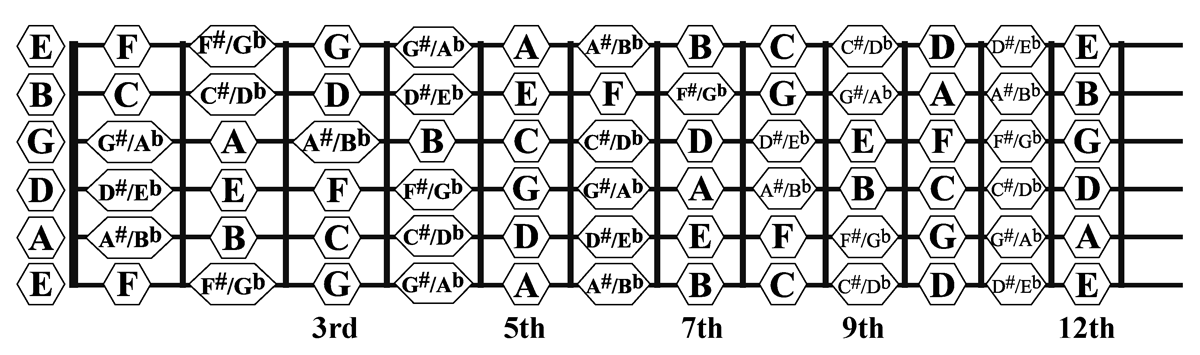
Next, we can re-name the sharp notes with their flat equivalents. This concept in music is referred to as "En-harmonic Notes," (same sound, different name). The fretboard below re-names the sharps from the above example, to their equivalent of flats.
FLATS:

The natural notes are the most important to memorize first. If you know where the natural notes are on the fretboard, you can easily fill in the blanks by adding a sharp note next to every natural note, except for E and B (as they do not have sharps).
Once the fretboard is populated with all of the sharp notes, it will look like this:
ALL NOTES /COMPLETE FRET-BOARD:

DAY 2:
Notes on the 6th and 5th Strings of the Guitar
After learning the open strings and how notes sit across the entire neck, you can start your memorization process. Learning the names of the notes on the 6th and 5th strings of the guitar is the first priority.
The most basic barre chords and power chords have their roots on either the 6th or 5th strings. And the most basics scales and arpeggios you'll tend to learn at first will have their tonic notes on the 6th and 5th strings.
In music we use the first 7 letters of the English alphabet for different notes. A B C D E F and G (these are known as the Natural Notes). A "Whole Step" is a term used for the distance of "2 frets" on the guitar. And a "Half Step" is "1 fret."
As long as you know this important music theory principle, you can find any natural note on the neck of the guitar.
Learning the Notes on the 6th String:
Now let’s apply that idea of whole and half steps to the 6th string. The open 6th string is an E. The F would be up a half step at the 1st fret. G, A and B would all be a whole step apart. Then between B and C is a half step. Then between C, D and E are all whole steps.

Once you reach the 12th fret, the note names start over. "E" on the 12th fret of the 6th string is an “octave” higher than the open string. You could continue on up the neck, but for our purposes right now we will stick to the first 12 frets.
Practice both playing and naming the notes up and then back down the neck. You can also give yourself additional fingerboard training by using the "Fretboard Cyber-Trainer" to help you further study the names of the notes on the neck. It's a fantastic online tool to help you develop the location of notes on the guitar neck.
Learning the Notes on the 5th String:
Now try the same thing on the 5th string from the open to the 12th and back down.


DAY 3:
OCTAVES:
Playing a note an octave higher means that you would play the exact same note but at double the frequency of the current note. Octaves can go either up or down in frequency, thus, you can half the frequency or you can double it. Either way, it will all end up being the same note.
There are multiple octaves for each note on a guitar’s fretboard. For example, let’s say we take the A note on the low E string. This note is located at fret position 5. However if we move up 12 frets (aka semitones) on the same string, we will end up at fret position 17 which is also an A note, just an octave higher.
Octaves aren’t only found by moving up 12 frets on a particular string. You can also find different octaves for the same note on different strings. Study the five octaves shown below. These octave layouts make up a huge part of the training involved in the Creative Guitar Studio - Intermediate Guitar Program.
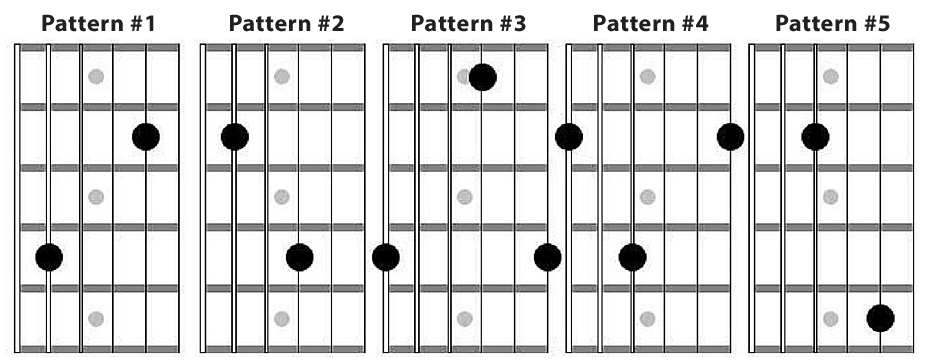
The best way to make a study of octaves is by selecting one note and plotting it's location all across the neck.
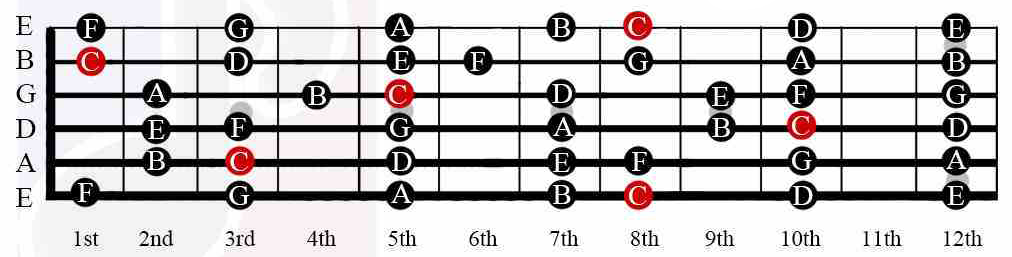
Use the "C Octaves" note chart below to practice this idea all across the neck.
"C Octaves"
With this simple 3-day guide you'll understand the layout of notes on the neck, how sharps and flats operate and you'll be able to plot out the octaves for any note. Continue practicing this, and over time you'll develop a keen sense for how every note sits upon the fingerboard.
___________________________________________________
GET GOOD NOW - JOIN THE MEMBERS AREA

Categories:

